How To Deploy a Dockerised Django API to Heroku
An in-depth guide to give you best practices when building in Heroku
While this article primarily focuses on the deployment process, I will also take a moment to explain some aspects of the codebase and strive to adhere to best practices as much as possible.
Without further ado, let’s dive in.
Getting the App Running in a Virtualenv Locally
To begin with a minimal setup for a new Python project, let’s create a virtual environment (virtualenv) to isolate the app dependencies.
First, create a new folder/directory to host the new project: Type the command below to create a new folder called new-project or any name you choose.
$ mkdir new-projectNavigate to the new-project folder and create a virtual environment named venv that will contain installed packages.
$ python3 -m venv venvNow, it is time to activate the created virtual environment, venv.
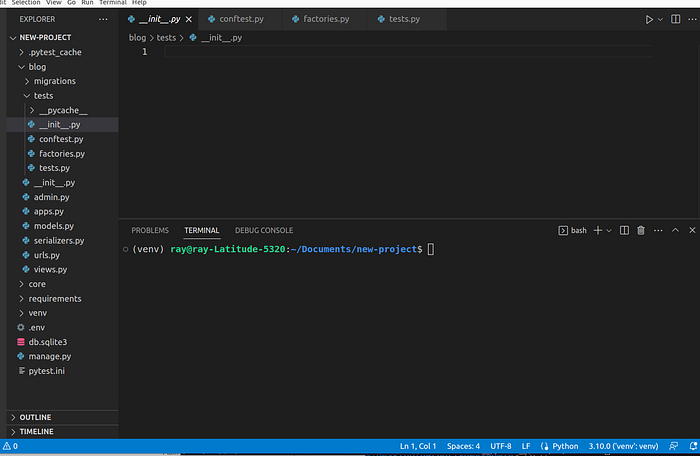
$ source venv/bin/activateIf the activation is successful, you will see the terminal/cmd now looks like this, i.e., the venv is enclosed in brackets as shown in the screenshot below:

Installing Project Dependencies
To simplify the process, we will create a folder called requirements in the base directory. Inside the requirements folder, we will create a base.txt file to hold the basic requirements and a dev.txt file that inherits from base.txt to hold additional requirements in development mode.
The advantage of this approach is that it allows for multiple sets of requirements based on different environments, such as development, staging, production, etc. This enables better flexibility and customization for different deployment scenarios.
base.txt
Django==4.0.6
djangorestframework==3.13.1
dj-database-url==0.5.0
django-cors-headers==3.13.0
psycopg2-binary==2.9.3
drf-spectacular==0.22.1
python-decouple==3.6
gunicorn==20.1.0
dev.txt
-r base.txt
pytest-django==4.5.2
pytest-factoryboy==2.5.0
Explanation of the Packages
- Django: a web framework
- djangorestframework: for creating APIs
- django-cors-headers: for handling CORS (Cross-Origin Resource Sharing) for security purposes
- drf-spectacular: for generating automatic documentation for our APIs
- gunicorn: a production-ready web server
- dj-database-url: for handling database credentials
- psycopg2-binary: for connecting Django to PostgreSQL
- python-decouple: for reading environment variables from a .env file
- pytest: for running and writing automated tests
Install Packages
Now that we have all the packages required, we can install them using pip, the Python package manager.
$ pip install -r requirements/dev.txtNote: Run the installation command at the root/base directory of your project(i.e., inside the new-project folder )
Next, create a new Django project called core
$ django-admin startproject core .Note: Run the command at the root/base directory
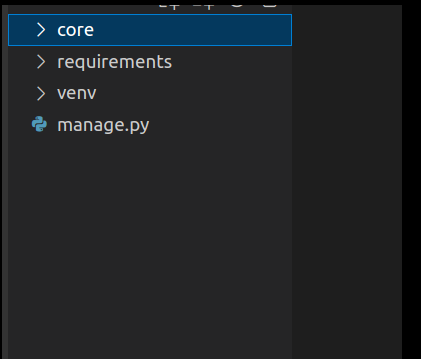
With this command, we have a new set of files and a folder, core.
Next, run makemigrations and migrate to apply changes to the default SQLite database. Here’s the code:
$ python manage.py makemigrations

$ python manage.py migrate
Start up the development server and access the welcome page on http://127.0.0.1:8000/.
$ python manage.py runserver
Congratulations on making it this far!
Settings File
Now is a good time to make the settings file flexible and configurable, just like we did with the requirements when starting the project.
The core folder contains a file called settings.py that contains project configurations and settings, such as databases, secrets, and other related configurations.
Here is the folder structure:
├── core
│   ├── asgi.py
│   ├── __init__.py
│   ├── __pycache__
│   ├── settings.py
│   ├── urls.py
│   └── wsgi.py
├── db.sqlite3
├── manage.py
├── requirements
│   ├── base.txt
│   └── dev.txt
To have different settings based on the environment, we must create a new folder called settings inside the core folder. We can then move the initial settings.py file into the new settings folder and rename it to base.py.

By now, we have the following folder structure:
├── core
│   ├── asgi.py
│   ├── __init__.py
│   ├── settings
│   │   ├── base.py
│   │   └── __init__.py
│   ├── urls.py
│   └── wsgi.py
├── db.sqlite3
├── manage.py
└── requirements
    ├── base.txt
    └── dev.txt
The new file __init.py__ in the settings folder is empty. It needs to be present for the settings folder to be recognized as a Python package.
Since our folder structure has changed, we must update Django to recognize the changes.
Locate the manage.py file in the root directory of your Django project and update the line in the file that sets the DJANGO_SETTINGS_MODULE to reflect any changes in your folder structure.
Initial:
os.environ.setdefault('DJANGO_SETTINGS_MODULE', 'core.settings')New:
from decouple import config

environment = config('ENVIRONMENT')
os.environ.setdefault("DJANGO_SETTINGS_MODULE", "core.settings."+environment)
Also, update core/wsgi.py to reflect the new changes.
Initial:
import os
from django.core.wsgi import get_wsgi_application

os.environ.setdefault('DJANGO_SETTINGS_MODULE', 'core.settings')
application = get_wsgi_application()p
New:
import os
from decouple import config
from django.core.wsgi import get_wsgi_application

environment = config('ENVIRONMENT')
os.environ.setdefault("DJANGO_SETTINGS_MODULE", "core.settings."+environment)

application = get_wsgi_application()
Aside from the base.py file, you can create a new file called dev.py in the settings folder. This dev.py file can inherit from base.py and include any additional configurations or overrides necessary for development settings.
For example, if you were to create another file called prod.py for production settings, it would be a good place to override and turn off the debugging mode by setting DEBUG = False in that file.
dev.py:
from .base import *
from decouple import config

ALLOWED_HOSTS = ['*']
Remember to import config from decouple, which is the package we use for reading environment variables. With this approach, we can simply mention the mode/environment we are in the .env file, and use config to access those values in our Django settings files, such as base.py, dev.py, and prod.py.
Here is the folder structure for the settings folder:
├── settings
│   │   ├── base.py
│   │   ├── dev.py
│   │   ├── __init__.py
Before moving on to the .env file, let’s mention some security measures.
If you look at the settings file (now base.py), there are a lot of secrets there that should not be in the codebase—application secrets, database credentials, etc. We must move all those from there and put them in the .env file. Python decouple comes to our rescue when reading it from there.
Identify the following variables and any other sensitive information in base.py and replace them as:
from decouple import config #Remember to import config

SECRET_KEY = config('SECRET_KEY')
DEBUG = config('DEBUG', cast=bool)
Creating .env File
At the root of the project, create an .env file and populate it with the following content:
ENVIRONMENT=dev
DEBUG=1
SECRET_KEY=thesecrekey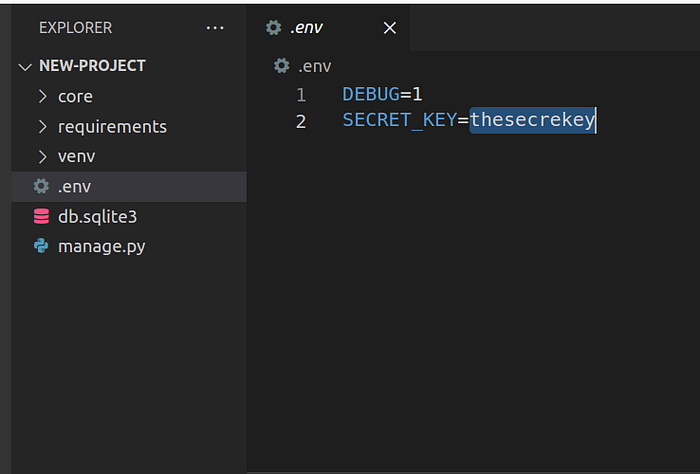
Run the development server again and verify if everything is working fine.
$ python manage.py runserverCreating our First APIs
Inside the new-project folder, let’s create our first app. Remember when you only created a project initially by running django-admin startproject core. Let’s create a simple blog app.
Note: Any manage.py command should be run where the manage.py file is located.
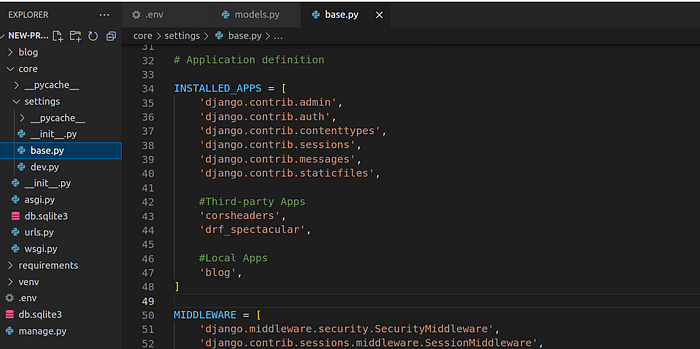
$ python manage.py startapp blogWe need to add the newly created blog app and some third-party apps to the INSTALLED_APPS list in the base.py configuration file.
INSTALLED_APPS = [

    #Third-party Apps
    'corsheaders',
    'drf_spectacular',

    #Local Apps
    'blog',
]
Inside the blog folder, we can update the models.py file to hold the schema/structure for our blog.
blog/models.py
from django.db import models


class Blog(models.Model):
    title = models.CharField(max_length=50)
    body = models.TextField()
    created_at = models.DateTimeField(auto_now_add=True)
    published = models.BooleanField(default=True)
Run makemigrations and migrate
$ python manage.py makemigrations
$ python manage.py migrate
Update the blog/views.py as follows:
from rest_framework import filters, viewsets

from .models import Blog
from .serializers import BlogSerializer


class BlogViewSet(viewsets.ModelViewSet):
    queryset = Blog.objects.all()
    http_method_names = ["get", "post", "delete", "patch"]
    serializer_class = BlogSerializer
    filter_backends = [
        filters.SearchFilter,
        filters.OrderingFilter,
    ]
    filterset_fields = ["published"]
    search_fields = ["title", "body"]
    ordering_fields = [
        "created_at",
    ]
Update blog/serializers.py
from rest_framework import serializers

from .models import Blog


class BlogSerializer(serializers.ModelSerializer):
    class Meta:
        model = Blog
        fields = '__all__'

    extra_kwargs = {
            "created_at": {"read_only": True},
        }
Update blog/urls.py:
from django.urls import include, path

from rest_framework.routers import DefaultRouter

from .views import BlogViewSet

app_name = "blog"

router = DefaultRouter()
router.register("", BlogViewSet)

urlpatterns = [
    path("", include(router.urls)),
]
Next, update core/urls.py to include urls.py for the blog app and also the URLs to automatic documentation
core/urls.py
from django.contrib import admin
from django.urls import path, include
from drf_spectacular.views import (
    SpectacularAPIView,
    SpectacularRedocView,
    SpectacularSwaggerView,
)

urlpatterns = [
    path('api/schema/', SpectacularAPIView.as_view(), name='schema'),
    path('api/v1/doc/', SpectacularSwaggerView.as_view(url_name='schema'), name='swagger-ui'),
    path('api/v1/redoc/', SpectacularRedocView.as_view(url_name='schema'), name='redoc'),
    path('api/v1/blogs/', include('blog.urls')),
]
Update settings/base.py to include DRF spectacular settings
REST_FRAMEWORK = {
"DEFAULT_SCHEMA_CLASS": "drf_spectacular.openapi.AutoSchema",
"TEST_REQUEST_DEFAULT_FORMAT": "json",
}
SPECTACULAR_SETTINGS = {
'SCHEMA_PATH_PREFIX': r'/api/v1',
'DEFAULT_GENERATOR_CLASS': 'drf_spectacular.generators.SchemaGenerator',
'SERVE_PERMISSIONS': ['rest_framework.permissions.AllowAny'],
'COMPONENT_SPLIT_PATCH': True,
'COMPONENT_SPLIT_REQUEST': True,
"SWAGGER_UI_SETTINGS": {
"deepLinking": True,
"persistAuthorization": True,
"displayOperationId": True,
"displayRequestDuration": True
},
'UPLOADED_FILES_USE_URL': True,
'TITLE': 'Blog API',
'DESCRIPTION': 'Blog API',
'VERSION': '1.0.0',
'LICENCE': {'name': 'BSD License'},
'CONTACT': {'name': 'Ridwan Ray', 'email': 'ridwanray.com'},
#OAUTH2 SPEC
'OAUTH2_FLOWS': [],
'OAUTH2_AUTHORIZATION_URL': None,
'OAUTH2_TOKEN_URL': None,
'OAUTH2_REFRESH_URL': None,
'OAUTH2_SCOPES': None,
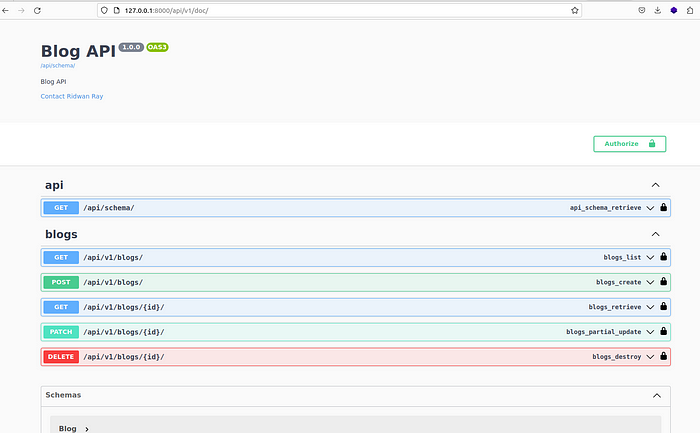
}Run the server to access the documentation on http://127.0.0.1:8000/api/v1/doc/
Ready to elevate 🚀 your Python 🐍 skills? Check out YouTube for exclusive content. Don’t forget to subscribe to the channel to stay updated with future releases.
Next, we must create a new tests folder inside the “blog” app to write automated tests to test if our API is working as expected.
Here is the structure of the tests folder located in the blog app folder.
├── tests
│   ├── conftest.py
│   ├── factories.py
│   ├── __init__.py
│   └── tests.py
__init__.py is empty
conftest.py
import pytest
from rest_framework.test import APIClient

@pytest.fixture
def api_client():
    return APIClient()
In conftest.py, we declared a pytest fixture, which is a reusable utility in our tests.
factories.py
import factory
from faker import Faker
from blog.models import Blog

fake = Faker()

class BlogFactory(factory.django.DjangoModelFactory):
    class Meta:
        model = Blog

    title = fake.name()
    body = fake.text()
    published = True
BlogFactory is used to create instances of the Blog model in tests, making it easier to generate test data for the application.
tests.py
import pytest
from django.urls import reverse
from .factories import BlogFactory

pytestmark = pytest.mark.django_db


class TestBlogCRUD:
    blog_list_url = reverse('blog:blog-list')

    def test_create_blog(self, api_client):
        data = {
            "title": "Good news",
            "body": "Something good starts small",
            "published": True
            }

        response = api_client.post(self.blog_list_url, data)
        assert response.status_code == 201
        returned_json = response.json()
        assert 'id' in returned_json
        assert returned_json['title'] == data['title']
        assert returned_json['body'] == data['body']
        assert returned_json['published'] == data['published']

    def test_retrieve_blogs(self, api_client):
        BlogFactory.create_batch(5)
        response = api_client.get(self.blog_list_url)
        assert response.status_code == 200
        assert len(response.json()) == 5

    def test_delete_blog(self, api_client):
        blog = BlogFactory()
        url = reverse("blog:blog-detail",
                      kwargs={"pk": blog.id})
        response = api_client.delete(url)
        assert response.status_code == 204

    def test_update_blog(self, api_client):
        blog = BlogFactory(published= True)
        data = {
            "title": "New title",
            "body": "New body",
            "published": False,
        }
        url = reverse("blog:blog-detail",
                      kwargs={"pk": blog.id})

        response = api_client.patch(url, data)
        assert response.status_code == 200
        returned_json = response.json()
        assert returned_json['title'] == data['title']
        assert returned_json['body'] == data['body']
        assert returned_json['published'] == data['published']
These are the actual test cases for typical CRUD (Create, Read, Update, Delete) functionalities.
Before proceeding to run the tests, we need to create a pytest.ini file, which is a configuration file for pytest. This file should be located exactly at the same location as the manage.py file.
pytest.ini
DJANGO_SETTINGS_MODULE = core.settings.dev
python_files = tests.py test_*.py *_tests.py
addopts = -p no:warnings --no-migrations --reuse-db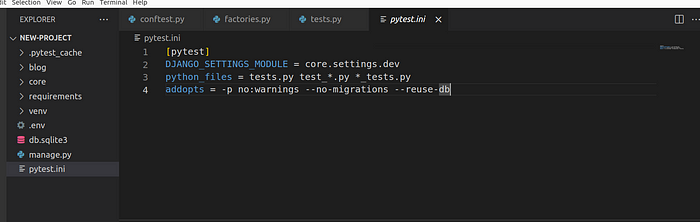
Running Test Cases
$ pytest Pytest allows for other arguments to be passed when running tests, such as -rP or -vv. You can refer to the pytest documentation for more information.

Voila! Congratulations on making it this far in the tutorial.
Dockerising the Django App Locally
To dockerize the app locally, we need two main files: Dockerfile and docker-compose file. Let’s start by creating Dockerfile and docker-compose file.
In the root directory, create a file docker-compose.dev.yml and add the following content:
version: '3.9'

services:
  api: &api
    build:
      context: .
      dockerfile: docker/dev/Dockerfile
    image: ray-blog-api
    command: python manage.py runserver 0.0.0.0:8000
    volumes:
      - ./:/app
    ports:
      - '8000:8000'
    env_file:
      - ./.env
    restart: unless-stopped
The Dockerfile used locally is specified as docker/dev/Dockerfile in the docker-compose file. We are adopting this approach to keep files separated based on environments easily. Please create a folder called docker, then inside it create another folder called dev, and finally, create a Dockerfile file in that folder.
The folder structure looks like this:
├── docker
│   └── dev
│       ├── Dockerfile
│       └── entrypoint.sh
Dockerfile
# Pull official base image
FROM python:3.10-slim

# Set working directory
WORKDIR /app

# Set env variables
ENV PYTHONDONTWRITEBYTECODE 1
ENV PYTHONUNBUFFERED 1

RUN apt-get update \
    && apt-get install -y gcc python3-dev musl-dev libmagic1 libffi-dev netcat libzmq3-dev git

COPY ./requirements ./requirements

# Install dependencies
RUN pip install --upgrade pip
RUN pip install -r ./requirements/dev.txt

# Copy entrypoint.sh
COPY ./docker/dev/entrypoint.sh /entrypoint.sh

RUN chmod +x /entrypoint.sh

COPY . /app

ENTRYPOINT [ "/entrypoint.sh" ]
In addition to the Dockerfile, we have also created an entrypoint.sh script to run some commands locally. Both the Dockerfile and entrypoint.sh are located in the same directory.
entrypoint.sh
#!/bin/sh
python manage.py makemigrations - no-input
python manage.py migrate - no-input
exec "$@"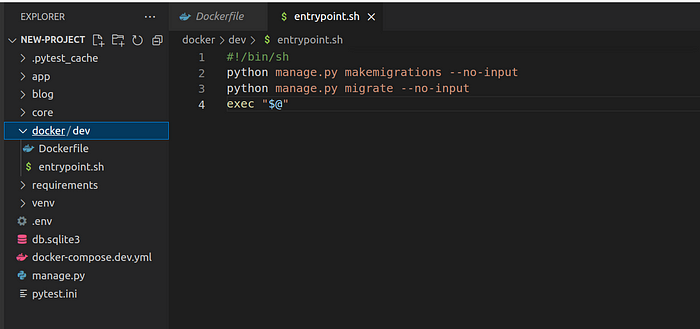
Now that all is set up, let’s build the image and start the container simultaneously using the following command where manage.py is located.
$ docker-compose -f docker-compose.dev.yml up --build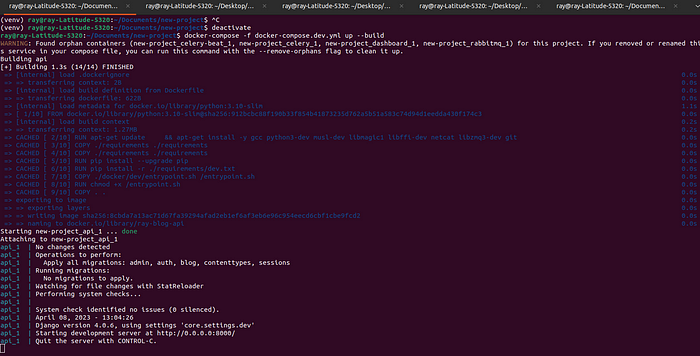
If you, like me, prefer not to type this long command every time, you can automate the repetitive work using bash. You can check out this link for instructions on how to do that: [link_here]
Curious about running test commands in a Docker container?
Type docker ps to know the name of the container. In my case, the name is new-project_api_1.
$ docker exec -it -w /app new-project_api_1 pytest
Deploy Dockerised Django App to Heroku
Sign up for a Heroku account (https://www.heroku.com/) and install the Heroku CLI (https://devcenter.heroku.com/articles/heroku-cli)
Creating an App on Heroku
Please pardon my typo: I have written “deloyment” instead of “deployment” in the article for the app name test-django-deployment-app. Please take note.
You need to log in to Heroku before you can create apps. Here’s how to do that:
$ heroku login

$ heroku create test-django-deloyment-app
Create PostgreSQL Database
$ heroku addons:create heroku-postgresql:mini --app test-django-deloyment-appWhen creating the database, we specify the name of the app for which we want to use the database. In our case, the previously created app is named test-django-deployment-app.
Ideally, we would have preferred to keep environment variables on the server ahead of deployment, but with the Heroku dyno, it is not possible as the server is not known ahead of time. One way to manage this is to set the environment variables in the app's dashboard.
You can add as many variables as you want by going to the Settings tab and then navigating to the Config Vars section.
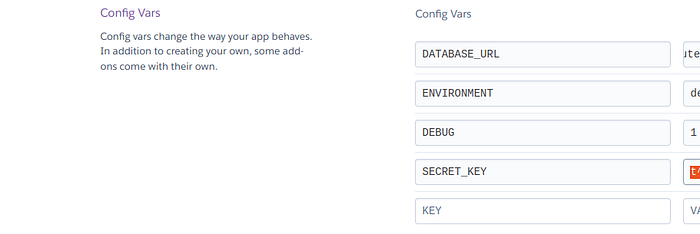
In our case, we are going to add the following variables in addition to what we have for DATABASE_URL:
ENVIRONMENTDEBUGSECRET_KEY
Note: To view more information about the database created via the command line interface (CLI), click on the app in the app dashboard, then navigate to the Resources tab. You will be able to see the created database under the add-ons section.
Update Database URL
Since our Heroku app will use PostgreSQL, let’s modify the Django settings to point to that.
You can update the DATABASES setting in settings/base.py file to configure the PostgreSQL connection.
Initial value:
DATABASES = {
    'default': {
        'ENGINE': 'django.db.backends.sqlite3',
        'NAME': BASE_DIR / 'db.sqlite3',
    }
}
New:
DATABASES = {
    "default": dj_database_url.config(default=config('DATABASE_URL'))
}
Remember to import dj_database_url and config at the top of the base.py file:
from decouple import config
import dj_database_url
Configure App Deployment Using Dockerfile
There are two ways to deploy a Dockerized app to Heroku:
- Using Build Manifest (https://devcenter.heroku.com/articles/build-docker-images-heroku-yml): In this approach, a
heroku.ymlfile is used to build a Docker image and deploy it to Heroku. - Using Container Registry (https://devcenter.heroku.com/articles/container-registry-and-runtime): In this approach, a prebuilt Docker image is deployed to Heroku from a container registry.
We will use the first approach, Build Manifest, in this guide.
Check out this guide to know why the migrations files are committed to the GitHub repo.
Create a heroku.yml file in the root folder.
build:
  docker:
    web: Dockerfile
run:
  web: gunicorn -w 4 core.wsgi:application --bind 0.0.0.0:$PORT
release:
  image: web
  command:
- python manage.py migrate --no-inputbuild: This section defines the Dockerfile for building the app's container image. It specifies the location of the Dockerfile to beDockerfilein thewebdirectory.run: This section defines the command to run the app’s container image. It specifies the use ofgunicornas the web server to run the Django application, using thecore.wsgi:applicationentry point, and binding to0.0.0.0:$PORT, where$PORTis a Heroku-provided environment variable that specifies the port to listen on.release: This section defines the command to run during the release process. It specifies the use of thewebimage (which was built in thebuildstep) and the commandpython manage.py migrate --no-inputto run database migrations for the Django application with the--no-inputflag to disable any interactive prompts during the migration process.
Also, create a new Dockerfile at the root directory specifically for Heroku deployment.
Dockerfile
# Use an official Python runtime as a parent image
FROM python:3.10-slim

# Set the working directory to /app
WORKDIR /app

# Set env variables
ENV PYTHONDONTWRITEBYTECODE 1
ENV PYTHONUNBUFFERED 1

# Install system dependencies
RUN apt-get update \
    && apt-get install -y gcc python3-dev musl-dev libmagic1 libffi-dev netcat \
    build-essential libpq-dev \
    && pip install Pillow

COPY ./requirements ./requirements

# Install dependencies
RUN pip install --upgrade pip
RUN pip install -r ./requirements/dev.txt

# Set the environment variables
ENV DJANGO_READ_DOT_ENV_FILE=True
ENV DOT_ENV_FILE=/app/.env

COPY . /app
├── blog
├── core
├── db.sqlite3
├── docker
├── docker-compose.dev.yml
├── Dockerfile
├── heroku.yml
├── manage.py
├── pytest.ini
├── requirements
└── venv
Set Heroku Stack
We need to inform Heroku that our app will be deployed and run using a Docker container on the Heroku platform.
$ heroku stack:set container -a test-django-deloyment-appInitialize git Repo
First, install the heroku-manifest plugin
$ heroku update beta
$ heroku plugins:install @heroku-cli/plugin-manifest
$ cd new-project/
$ git init
$ git add .
$ git commit -m "Init commit"Add the Heroku remote repository
$ heroku git:remote -a test-django-deloyment-appPush the code to the Heroku remote repository on the master or main branch depending on what is in use.
$ git push heroku masterIf the above throws an error (with master and main branch), you may need to manually push a specific branch to Heroku remote using this command:
git push heroku ft/ray/deployment:mainHere, I push a branch named ft/raydeployment to the remote branch.
Sometimes, you may need to push a specific branch.
Great news! The app has been successfully deployed.

Use the Heroku logs command to troubleshoot any error.
heroku logsGitHub Workflow for CI/CD Pipeline
We must create a YAML file (i.e., deploy_dev.yml) under the folder .github/workflows.
Here is the folder structure:
├── .github
│   └── workflows
│       └── deploy_dev.yml
deploy_dev.yml
name: Deploy Development
on:
push:
branches: [main]
jobs:
build:
runs-on: ubuntu-latest
env:
DEBUG: 0
DATABASE_URL: postgres://user:pass@localhost/test_db
SECRET_KEY: somesecrete
ENVIRONMENT: dev
services:
postgres:
image: 'postgres:alpine'
env:
POSTGRES_USER: user
POSTGRES_PASSWORD: pass
POSTGRES_DB: test_db
volumes:
- 'db-data:/var/lib/postgresql/data'
ports:
- '5432:5432'
options: >-
--health-cmd pg_isready --health-interval 10s --health-timeout 5s
--health-retries 5
steps:
- uses: actions/checkout@v2
- name: Set up Python 3.10.x
uses: actions/setup-python@v2
with:
python-version: '3.10.x'
- name: Install Dependencies
run: |
python -m pip install --upgrade pip
pip install -r requirements/dev.txt
- name: Run migrations
run: |
python manage.py makemigrations
python manage.py migrate
- name: Run Tests
run: |
pytest
- name: Push to server and deploy
uses: akhileshns/heroku-deploy@v3.12.13
with:
heroku_api_key: '${{secrets.HEROKU_API_KEY}}'
heroku_app_name: '${{ secrets.HEROKU_APP_NAME }}'
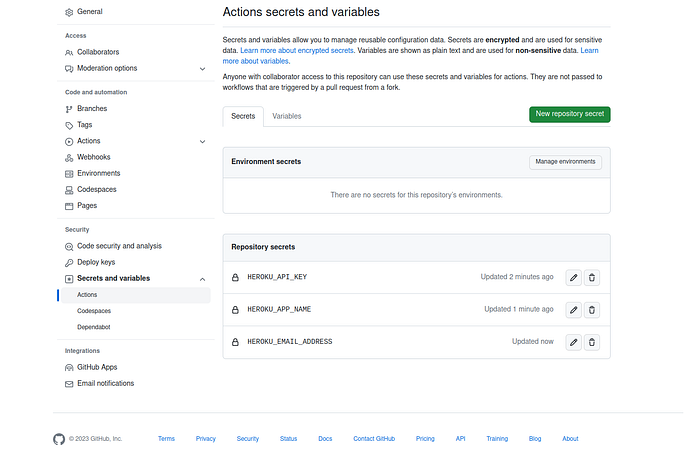
heroku_email: '${{ secrets.HEROKU_EMAIL_ADDRESS }}'On the Heroku dashboard, under ‘Account Settings,’ you can find the HEROKU_API_KEY required for GitHub integration. The HEROKU_APP_NAME refers to the name of your app on Heroku, while the HEROKU_EMAIL_ADDRESS should be your account’s email address.
Head over to your GitHub repository for the app, navigate to the ‘Settings’ tab, then select ‘Secrets and Variables,’ and finally ‘Actions’ to set up the secrets HEROKU_API_KEY, HEROKU_APP_NAME, and HEROKU_EMAIL_ADDRESS.
Click ‘New repository secret’ to add a secret credential.
Before committing all the changes to the repository, we can add an extra field to the blog model and see if it reflects after a successful deployment.
blog/models.py
from django.db import models


class Blog(models.Model):
    title = models.CharField(max_length=50)
    body = models.TextField()
    published = models.BooleanField(default=True)
    extra_info = models.CharField(max_length=50,blank=True, null=True) #new field
    created_at = models.DateTimeField(auto_now_add=True)
$ python manage.py makemigrations$ git add .
$ git commit -m "heroku deployment"
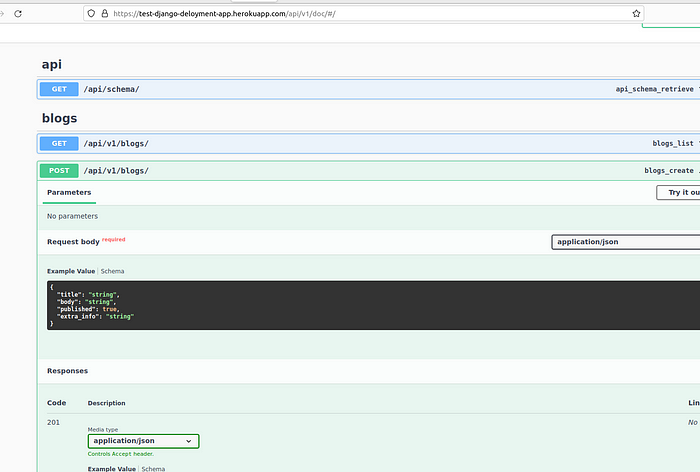
$ git pushVisit the documentation after a successful deployment to see that the database has been successfully updated, as well as the API documentation.
Thanks for reading.
If you want the build to be triggered from a different branch (e.g., develop) instead of the default main branch on GitHub, here is a summary.
- Heroku login
- Create app
- Set stack, i.e., Heroku stack:set container -a app-name
- Update beta and install Heroku CLI
- git init, add, commit(remember to add
heroku.ymlandDockerfile) - heroku git:remote -a app-name
- git push heroku master
Add the current repo to GitHub’s remote main and push.
Create a develop branch (or the branch name of your choice, which is where you want to trigger deployment) from the current main locally and add workflow to it.
Push the develop branch to remote and set it as the default branch.
Now, every push to develop will trigger the build.
Check this repo: here
Deploying an Existing Repo
Most of the time, you will likely deploy an existing repository rather than initializing a new one from scratch. Here is a summary of how to do that:
- Heroku login
2. Create app
3. Update beta and install Heroku CLI
4. heroku stack:set container -a from-exist
5. heroku git:remote -a app-name
6. git push heroku existing-branch (i.e., develop):master
Thanks for reading and feel free to explore my video collection on YouTube for more educational content. Don’t forget to subscribe to the channel to stay updated with future releases.
Want to Connect? Follow me to stay updated when a new article comes out. Here’s my LinkedIn.

